Product Requirements:
Pentium processor with Windows 95,
Windows 98, or Windows NT 4.0, Windows 2000, or Windows XP, Windows ME; 32MB RAM
minimum; between 300 MB and 1.5GB free hard disk space; CD-ROM drive; available
serial port; 256 color display adapter and monitor (24 bit recommended); and
mouse or other pointing device; PC Interface cable. Internet access is also
recommended to make use of the unlock process
Device:
Powered by either 12-volt power cord or six AA
batteries
When I bought my 2003 Ford F-150 Harley Davidson SE truck, I was momentarily
tempted to get the in-dash satellite navigation system that was being offered
for my particular model. That is, until I realized that it was a voice prompt
only (no visual maps or button input) unit and that the cost was $1569 plus
approximately $130 for the installation. Aye Chihuahua!
For those of you that aren’t familiar with what GPS (Global Positioning
System) is or how it works, here is a page that can give you more
information.
Obviously, I know that there are other aftermarket GPS
options available, but I wanted to
try a solution that wasn’t dependent on my already owning or buying a PDA. In
other words, I wanted to try a dedicated, portable, full color, top of the line,
mack-daddy GPS system. Garmin was
kind enough to send me a loaner unit of their
Street Pilot III Deluxe,
which met all of the above qualifications.
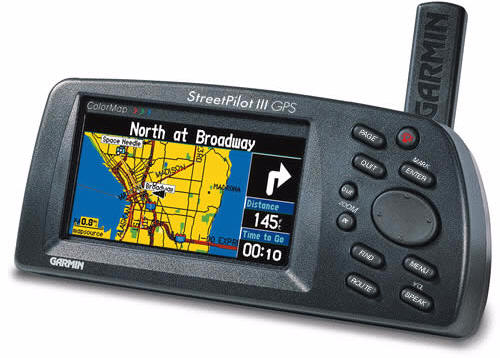
Photo courtesy of the Garmin website.
When I first opened its box, I have to admit that I was taken aback by the
size of the SPIII. Weighing 1.6 pounds (with batteries) and measuring 6.75" wide
x 3" tall x 2.125" thick before adding any brackets, mounts or cables, the
Garmin is a bit of a brick. But once I turned the unit on and saw its gorgeous
screen, I could breathe again.
Setting the Garmin to the side, I found the following items inside the box:
PC interface cable,
dashboard
mount,
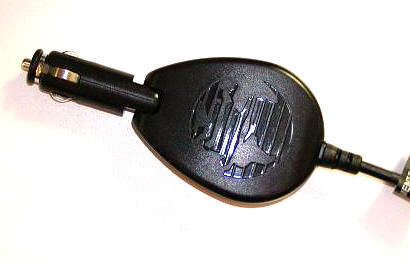
portable (bean bag) mount, external speaker with 12-volt cigarette lighter
adapter,
MapSource City Navigator North America CD with full coverage and full unlock
(worth $233.32 by itself), 128 MB data-card (already installed in the unit’s
card port), owner’s manual, quick reference guide, and a USB data-card
programmer.
One caveat in regards to this review: I was not provided with a map software
unlock code, therefore I was not able to do anything pertaining to loading and
installing maps directly from my PC to the Garmin data-card.
This Garmin review unit came with the built-in
Americas Autoroute Basemap and detailed maps of what amounts to "zone
2" of the United States loaded on the data-card.
Depending on your needs, there are three other map configurations by which
you can order the SPIII:
- Europe, which includes:
Atlantic Autoroute Basemap,
MapSource City Navigator Europe CD with full coverage and full unlock, and
a 128 MB data-card. - Australia, which includes:
Pacific Autoroute Basemap,
MapSource
City Navigator Australia CD with full coverage and full unlock, and a 64
MB preprogrammed data-card. - South Africa, which includes:
Atlantic Autoroute Basemap,
MapSource City Select® South Africa CD with full coverage and full unlock,
and a 32 MB preprogrammed data-card.
As I mentioned, the Garmin comes preloaded with the Americas Autoroute
Basemap. This is a map that shows "oceans, lakes, rivers, airports, cities,
interstates or major motorways, principal and major thoroughfares, political
boundaries, federal interstate highway exit information for services such as
food, lodging and truck, RV and automotive service stations in the US only."
What this means is that even if you don’t have the detailed map for a particular
region installed, you will still be able to get to just about North American
city and access various Points of Interest (POIs) along the way.
Before we go much farther, let’s take a look at the actual GPS receiver
hardware…
Hardware Specifications:
According to the Garmin site, these are the hardware specs for the Street
Pilot III:
GPS performance Receiver: Differential-ready 12 parallel channel
GPS receiver continuously tracks and uses up to 12 satellites to compute and
update your position
Acquisition times: Warm: Approximately 15 seconds, Cold: Approximately 45
seconds, AutoLocate®: Approximately 5 minutes
Update rate: 1/second, continuous
GPS Accuracy: Position: < 15 meters, 95% typical*, Velocity: 0.05
meter/sec steady state
DGPS Accuracy: Position: 3-5 meters, 95% typical*, Velocity: 0.05
meter/sec steady state
Position: 3-5 meters, 95% typical*
Velocity: 0.05 meter/sec steady state
Dynamics: 6g’s
Interfaces: RS232 with NMEA 0183
Antenna: Detachable with standard BNC-type connector
Physical Size: 3.2"H x 6.8"W x 2.6"D (8.0 x 17.3 x 6.5 cm)
Weight: 1.4 pounds (635 g)
Display: 3.4"W x 1.8"H (8.6 x 4.5 cm), (305 x 160 pixels), high-contrast,
16-color LCD with backlighting
Case: Rugged; fully gasketed
Temp. range: 5°F to 158°F (–15°C to 70°C)
Data storage: Indefinite; no memory battery required
Map storage: Data cards store detailed map data
Power Source: 6 AA batteries or 12-volt adapter cable
Battery life: 2–20 hours based on backlight setting
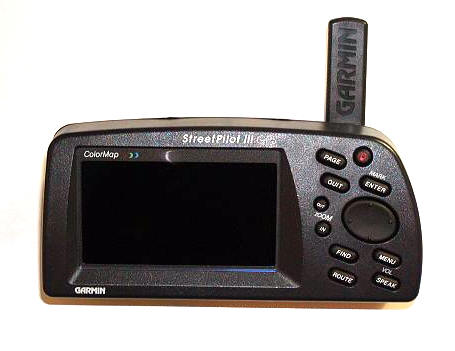
As I mentioned before, the Garmin weighs1.6 pounds (with batteries) and
measures 6.75" wide x 3" tall x 2.125" thick. The unit’s casing is made of thick
black plastic that feels extremely sturdy and easily passes Julie’s patented
creak-test. In fact, it is no exaggeration to say that this unit is rock-solid.
The power and data-card ports are protected by flexible rubber covers, which
makes the SPIII ideal for outdoor use. These gaskets should protect the ports
from dirt and light drops of moisture, but I am sure that the Garmin is not
intended to be used in serious rain.
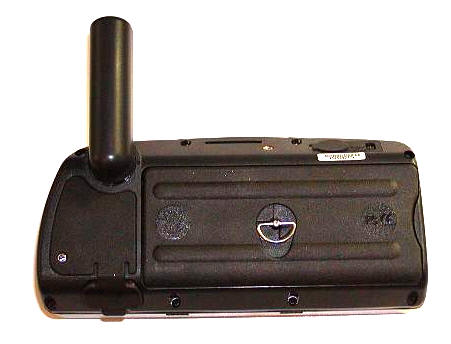
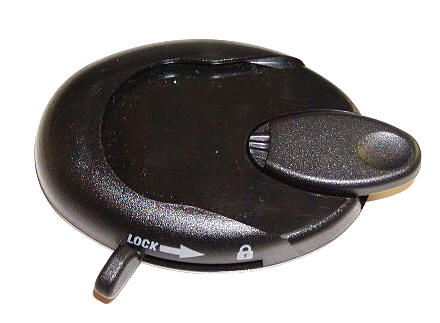
When using the Street Pilot III in a vehicle, you will need to attach a few
items for a proper mount DC powering. First, you must attach the mounting
bracket which snaps on to the back then screws securely into the top of the
Garmin.


Next, you will need to attach the DC power port. This plugs into the back of
the SPIII, while the integrated speaker cord plugs into the jack on the lower
left side. The speaker cord threads through the back of the mounting bracket to
keep things neat.
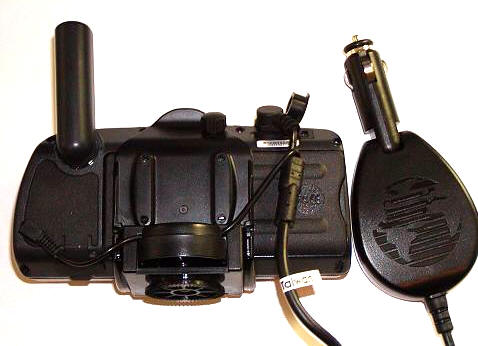
When the DC cord is plugged into your vehicle’s power port (or cigarette
lighter, if you smoke), power will not only be supplied to the unit, but voice
directions will also be broadcast from the speaker-box attached to the plug.
Figuring out a position for mounting the Garmin on your vehicle’s dash
can be a bit tricky. It is important to choose a spot that doesn’t block your
vision in any way, and that makes the SPIII accessible to your co-pilot.
If you have no objection to permanently attaching something to your dash, then
you can use the included lower profile dashboard mount.
If you have an aversion to 3m tape or if you want to be able to just pick up
the whole unit and throw it into one of your other vehicles at a moment’s
notice, then you will want to use the portable (bean bag) mount.
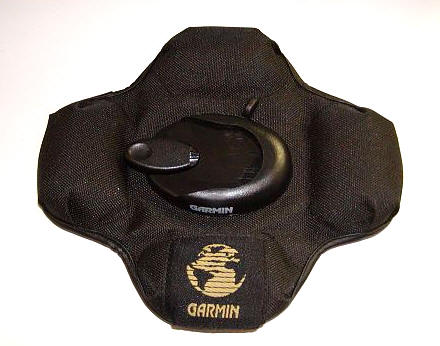
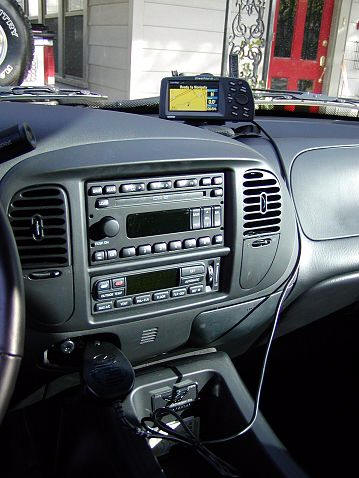
Once you have figured out what type of base mount you prefer, it is simply a
matter of locking the Garmin with attached mounting bracket and DC cord into the
base. Here you can see it in the portable mount on my dash.
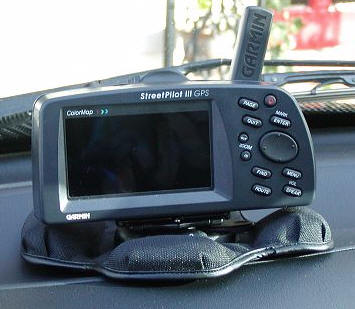
While I am on this topic, I should mention that I found the portable mount to
be extremely stable even when driving on bumpy roads. The only thing I would
caution you about is that the Garmin does weigh over a pound and when using the
portable mount the SPIII is not actually locked down, so there could be unwanted
movement in the event of hard braking.
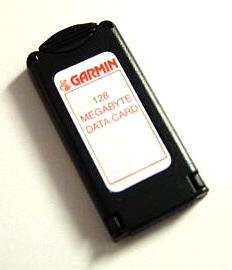
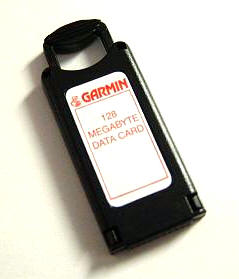
One last hardware item worth mentioning is the data-card. I don’t know why,
but I just assumed that the Garmin would use a known memory card format. Well
guess what…it doesn’t. Garmin has their own proprietary (meaning expensive)
data-cards available in various memory denominations from 8 – 128MB. These cards
are pretty wild: they are rectangular, thick, and have a retractable handle for
facilitating insertion and removal.
That pretty much sums up the hardware aspects of the Street Pilot III, now
let’s talk about my experience with the Garmin…
My User Experience:
The first day I had the Garmin I quickly realized that I would not be able to
upload any maps to the unit myself (no codes) and that there had been a reason
the Garmin rep had asked where I would be driving (so he could load the maps to
the data-card himself). All that was left was for me to do was to set my home
address as a destination.
Figuring I would do this from the comfort of my desk, I powered up the
Garmin. Since I was inside, it spent a bit of time trying to acquire a GPS
signal. Soon, a menu popped up offering the choice of indoor use (for
faster route planning), new location (if you have moved hundreds of
miles), stored w/o batteries (if the date is no longer correct), or to
continue acquiring (if no other option applies).
I highly suggest that you take the time to route your trips or to
create your favorite destinations (Waypoints) while you are at the comfort of
your desk. Once in the car, the process is a bit tedious and probably not
something you or your passenger will want to fool with.
Here is a run-down of the steps it took to enter my home address:
1. Hit the find button
2. Scroll down to Addresses, hit enter
3. Hit enter again to highlight the street number
5. Use the nav-pad to scroll up or down until the correct number is selected
6. Scroll right to move to the next number in the sequence
7. Continue process until the correct street number is displayed
8. Hit enter
9. Scroll down to the next field, Street
10. Hit enter
(new screen)
11. Scroll up or down with the nav-pad until the correct number or letter is
selected
12. Scroll right to move to the next number or letter in the sequence
13. Continue process until the correct street is displayed (a list of possible
matches will be displayed under the area you are working in. This greatly helps
reduce the time it would otherwise take to do this step)
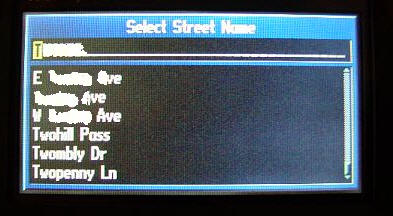
14. Hit enter
15. Scroll down the list and select the street by hitting enter
(Back to main screen)
16. Scroll down to the next field, City
17. Hit enter
(new screen)
18. Scroll up or down with the nav-pad until the correct letter is selected
19. Scroll right to move to the next letter in the sequence
20. Continue process until the correct city is displayed (a list of possible
matches will be displayed under the area you are working in. This greatly helps
reduce the time it would otherwise take to do this step)
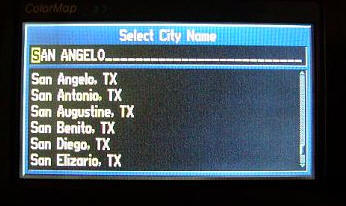
21. Hit enter
22. Scroll down the list and select the city by hitting enter
(Back to main screen)
23. Scroll down and select Find
24. Hit enter
A screen titled Select Address will pop up, hopefully with a 100%
match for the address you entered. In this case, there is one…
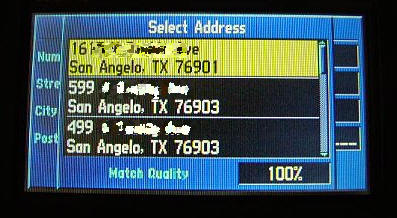
25 Hit enter
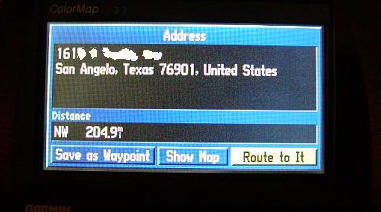
A screen titled Address will come up with three choices at the bottom:
Save as Waypoint, Show Map, and Route to It.
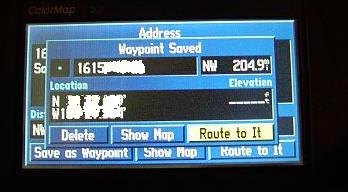
After accomplishing the previous steps, I definitely wanted to save my
address as a Waypoint. Once that option was pressed, a new screen opened,
telling me that the Waypoint had been saved, upon which time I could choose to
Delete (heaven forbid), Show Map, or Route to It.
I have to tell you, being PDA-centric for as long as have been, I have truly
become accustomed to entering data via a touch-screen. I guess I am a bit
spoiled, but it just seemed incredibly tedious to have to manually enter every
character of an address through the use of a four-direction nav-pad and an enter
key.
Now that my home address was set as a waypoint, I decided I was ready to
install the Garmin in my truck. I figured I needed to get used to its presence
as well as it’s GUI. After all, this is not a unobtrusive little device..
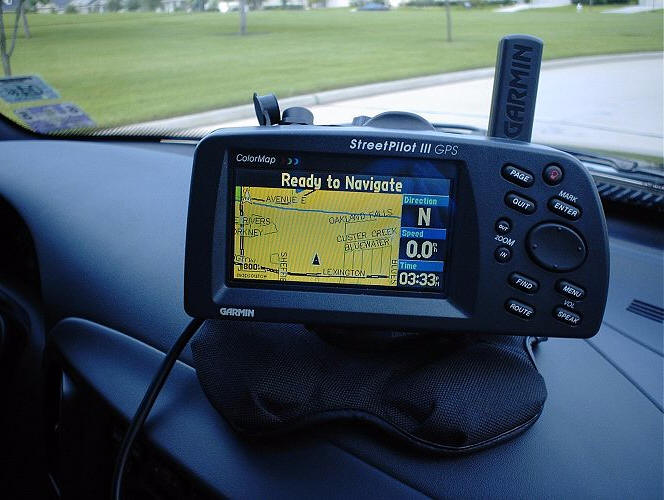
The installation was painless, I simply set the unit (in the portable mount)
on my dash, plugged it in, turned it on, and pressed enter twice to pass
up the splash screen and obligatory warning about not attempting to enter route
information while driving. I would say "well duh," but I am sure that
there are those who actually think that they are indestructible and will attempt
it.
The next screen was a zoomed out map showing my home, which also happened to
my current position. I continued to see this screen until the GPS acquired its
satellites and registered my location.
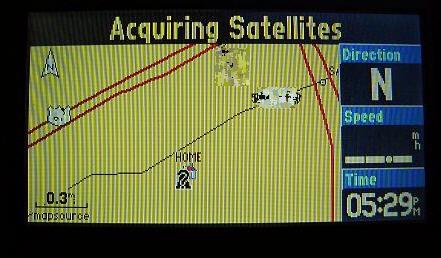
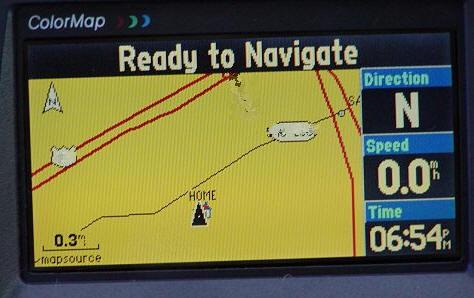
As soon as the GPS has picked up the needed satellite signal, the next screen
is my location, with a triangle marking my spot.
Even though it is nice to cruise around and see your position on the GPS
screen and watch as marked streets go by, it’s not really using the GPS for what
it was intended: getting you from Point A to Point B wither in the shortest or
quickest manner – and without letting you get lost.
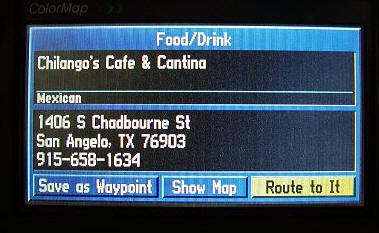
With that in mind, I decided to use the Points of Interest menu to
find a restaurant for dinner. Before I started the truck, I pushed the Find
button, highlighted Points if Interest and pressed enter. A new
screen popped up listing various POIs, and I chose Food & Drink by
pressing enter. Scrolling through a variety of different types of
restaurants, I chose Mexican. I am not sure what a restaurant has to do
to get included in the POI list or how often the list gets updated, but I did
notice that there were quite a few businesses that had not been open – some for
years – that were still listed on the list. Still, it was pretty cool to be able
to choose a restaurant and route to it in this manner. I selected Chilango’s
Cafe and Cantina, the pressed the option to Route to it.
A screen popped up, asking if I wanted the Faster Time, Shorter
Distance, or Off Road route.
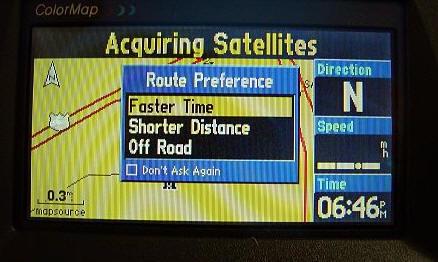
I figure no one wants me driving through their lawns, so instead of off road,
I selected the faster time. After a short wait, during which time a graphic
displays on the bottom left of the screen (showing that it is plotting my
drive), the route appears. Not only does the Garmin tell me how to get there, it
shows my direction, estimates the distance left, and displays the approximate
driving time left. Pretty cool!
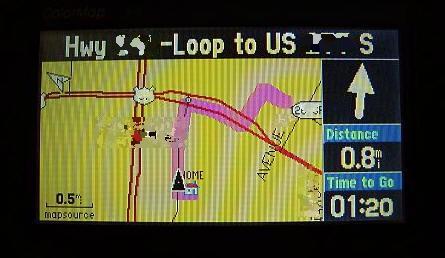
Notice all the little icons on the screen? There is a detailed
Map Legend
available at the Garmin site to help you decipher everything.
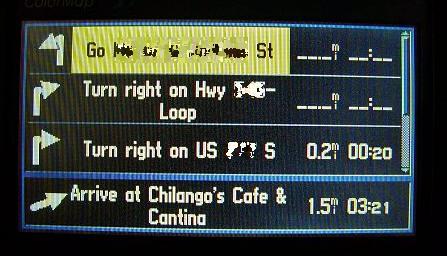
Another cool feature of the SPIII is that it will show the list of directions
for the entire trip. This is handy when you have someone in the backseat asking
what the whole route will be.
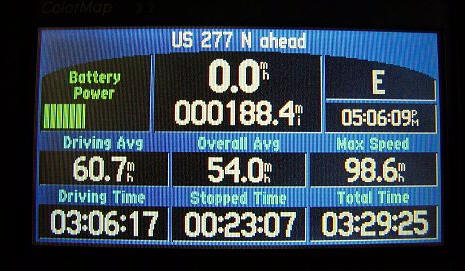
When you do not have a planned route entered, the screen will display your
direction, speed, and the time.
Some of the navigational features of the Garmin include:
Routes: Automatically calculated with turn-by-turn instructions.
Up to 50 stored. Using built-in Basemap, routes include interstates, highways
and major thoroughfares. With detailed data from CD-ROM, routes include
residential street-level detail within metropolitan areas.
Voice: Navigation instructions and warnings
Waypoints: 500 with name and graphic symbol
Track log: 2000 track log points
Trip computer: Reset-able odometer, timers, average and maximum
speeds
The Garmin is capable of zooming in to a screen-width scale of 900 feet or
zooming out to a screen-width scale of 6,100 miles.
If you are having trouble figuring out how to work your Garmin, there is an
Instructional
Video that you can buy ($16.53). Personally, i think that they should have
included it in this package. It may be true that not everyone will need it, but
I think it was cheap not to include it for those that do. Included on the video
are:
- Explanation of GPS
- Turn-by-turn and voice prompt guidance
- Map page features and how to customize the display
- Downloading maps from the MapSource™ City Navigator CD-ROM
- The function keys and what they do
- Finding destinations
- Marking waypoints
- Automatic routing
I had thought that one of the high-points of trying out the Garmin would be
using it for the six hour drive to Houston, and routing the quickest way to our
friend’s home. It was a doomed prospect from the beginning…First of all, I
waited until we actually started the trip before I began to enter their address
into the Garmin (Steve was driving). I must have spent 30 minutes trying to
convince the SPIII that a home built in 1999 existed. The Garmin did not agree,
and would not allow me to route. Needless to say, I was frustrated and wound up
putting the device in the console for a good part of the drive. See how petty I
can be? I’m not particularly proud of myself, but that is what I did. Finally, I
decided that once we got to our friend’s home, I would turn on the GPS and see
why it wouldn’t recognize their address.
Here is what I got…evidently their street doesn’t exist.
Picture taken with my Sony CLIÉ NZ90, by the way
I looked throughout the Garmin pages, but I could not find anything stating
how old the maps that they use are. I am going to guess mid to late 90s, since
the street was present before 2000. I did find this statement, though: "Please
Note: Garmin strives to provide its customers with the most economical,
accurate, and up-to-date electronic maps available. However, features are
continually changing, so the data may not reflect the latest modifications
and/or additions in your area."
So I suppose that if you are trying to find a location that has been around
since before the mid-90s, you should have no problem. I have a feeling that this
problem is going to occur with any mapping software.
On our trip from Houston to Austin, I fell in love with the Garmin. Instead
of trying to enter a physical address, I just entered the city name and let the
Garmin take us the fastest route. It was great seeing all of our twists and
turns mapped out for us, and the vocal prompts were straightforward and loud
enough to hear over the stereo.
The trip computer was a cool feature too, as it told us our average speed –
as well as our top speed.
On a side note, I should mention that the screen is extremely
susceptible to fingerprints and smudges. I have an old suede PDA screen
polishing cloth, and it seemed to do a very good job of keeping the SPIII
clean. You should also make sure that you have a large enough place to store the
Garmin (perhaps in a center console or under a seat), as you will not always
want to leave it exposed on the dash.
The Garmin Street pilot III has a few knocks against it: It is expensive, it
is big, and entering addresses is a bit of a pain when using the nav-pad and
enter button. On the other hand, getting an in-dash navigational system for your
vehicle is ridiculously expensive – and that is if there is even one offered for
your make and model. The Garmin can be moved from vehicle to vehicle, or be used
as a stand-alone unit when you are hiking. That helps to soften the blow of its
cost. Entering addresses is a pain, but I can tell you that the more addresses
you enter, the less trying it becomes…but it still isn’t fun. However, once an
address is entered, you can save it and never have to re-enter it again. The
Garmin gives excellent directions as long as the address is in it’s database,
and there are always ways around it if you need an address but the neighborhood
is too new to be mapped; for instance, searching for cross streets.
If you want the security of in-vehicle navigation, but don’t want to pay an
outrageous dealer’s fee for a unit that stays with your auto when you sell it,
then you should check out the Garmin Street Pilot III Deluxe.
Price:
$999.99
MSRP with no monthly service or hook-up fees Check for latest prices
Pros:
Extremely rugged and durable body
Bright colorful screen
Highly detailed and explicit voice prompts
Driving directions are plainly displayed on screen
Can be transferred from vehicle to vehicle
Can be used outside of vehicle as a standalone unit
Cons:
Big, bulky unit
Expensive
Maps may not reflect newer addresses
POIs may not be completely up to date
Time consuming to enter addresses with 4-way nav-pad and enter button
Instructional video is not included

2-Pack LED Video Light Kit, NiceVeedi Studio Light, 2800-6500K Dimmable Photography Lighting Kit with Tripod Stand&Phone Holder, 73" Stream Light for Video Recording, Game Streaming, YouTube
(as of June 8, 2026 12:59 GMT -05:00 - More infoProduct prices and availability are accurate as of the date/time indicated and are subject to change. Any price and availability information displayed on [relevant Amazon Site(s), as applicable] at the time of purchase will apply to the purchase of this product.)
ALTSON 60 LED Portable Selfie Light Video Conference Lighting with Clip & Camera Tripod Adapter Rechargeable 2200mAh CRI 97+, 3 Light Modes for Phone iPhone Webcam Laptop Photo Makeup
(as of June 8, 2026 12:59 GMT -05:00 - More infoProduct prices and availability are accurate as of the date/time indicated and are subject to change. Any price and availability information displayed on [relevant Amazon Site(s), as applicable] at the time of purchase will apply to the purchase of this product.)Product Information
| Price: | 999.99 |
| Manufacturer: | Garmin |
| Pros: |
|
| Cons: |
|
Gadgeteer Comment Policy - Please read before commenting
Post your comments here on the Garmin Street Pilot III Deluxe Version GPS.
http://www.the-gadgeteer.com/garmin-street-pilot-3-review.html
Just click the POST REPLY button on this page.
Great review!
Can’t wait till you get your hands on the Garmin iQue..
About the SPIII being expensive, if you do some searching on the web you tend to get a lot better prices than the RRP…
Thank you! :0)
If you will click the $999 MSRP at the end of the review, it takes you to http://www.pricegrabber.com. 😉
Judie :0)
Exelent, didnt see that yet 🙂
FYI I did a quick search and found one for $650.. so quite a big difference 🙂
Also Garmin has some kind of policy that webstores cant advertize certain product below the RRP, but they can sell it below RRP so sometimes you need to email the website to get the real price.
For example the iQue has a RRP of above $550 but you can find them online for around $450..
Hi Judie, I enjoy your reviews [most of the time] but I’m really tired of hearing about your “2003 Ford F-150 SE HD SuperCrew” This is the 2nd time you have mentioned it. Its bugging me because I know the majority of people who visits this site can’t afford a truck of that price. Why can’t you just say a new Ford Pickup? Now, I’m not saying Fords are bad, I have a 2002 Ford F-150 Lariat. I’m sure you mean well, but some people might take it the wrong way. Anyway, thats all I’ll say. Keep up the good work 😉
I can understand where you are coming from, but since I love my truck and I am making payments on it for the next 500 years, I figure I am going to talk about it a bit. Besides – I got a great deal on it! No where near retail, in fact – I probably paid about the same as you did on your truck when you bought it last year…and no, I don’t have a cousin that owns a dealership. 🙂
Judie :0)
Mmmm sounds like you are jealous.. 😉
Judie is just very happy with her car, I think that is great for her.
Think of it as a big gadget 😉
Even if I could afford a car like that (btw how much are they?) I wouldnt but a truck. But if Judy likes it, fine…
Sorry Judie, I guess I sorta flew off the handle. I just thought some people might take it the wrong way. Anyway, cool review about the GPS. I noticed you planned a trip from Houston to Austin. I live just outside of Houston. But since we are on the subject of GPS, I own a Garmin Etex Legend that I use a lot in my truck. My father just bought the Garmin V for use in our motorhome. He has 3 GPS systems anyway, I don’t know why he needs another…Oh well, its his money. Check out ebay right now, just search Garmin, and it will bring up all kinds of cool accessories. Anyway sorry for the outburst.
P.S, this is for “ToolKit”. Just to satisfy your curiosity, first, no I’m not jealous about Judie’ truck. Second, Her truck would cost about 44K RETAIL, but it sounds like she got one heck of a deal. Third my truck cost about 34K RETAIL, but I got it for only 19K.
just curious, and maybe I missed it in your review, but I had heard that the Garmin had received knocks for the fact that it can be slow in re-drawing, such that you can already be past your turnoff before you realize (in tight circumstances). In addition, it takes some time in recalculating your route if you accidently go off it. What was your experience with this?
Also, how was the volume on the voice directions in your truck (which I assume is noisier than some sedans)
Lack of reviews notwithstanding, it seems that the iQue might end up being the way to go. Figure that it has similar capabilities as the Streetpilot, a better text entry system, a bigger display, an industry standard memory card format…and a fully functional PDA to boot! It’s also considerably cheaper!
I’ll just sit here and twiddle my thumbs until Julie and Judie get their hands on one for a review!
Great review. I’m just impressed with the max speed number 🙂
Mike
Ford F-150 – This goes to show you what our economy is like right now, that I could get such a good deal…well, plus the fact that Steve is a no-holds-barred kind of auto negotiator, and I let him handle the purchase. 😉
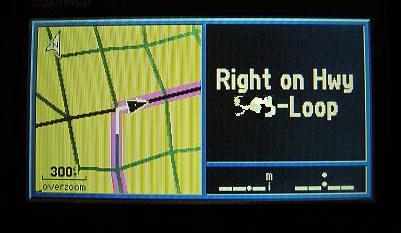
Capt Kanga – it does take a little while to re-route, but it didn’t seem any longer than it took with the Destinator GPS that I reviewed. I just figured it was about standard. There would be a couple yards of lag, but I didn’t miss any turns because not only was there a voice promt, the street to turn on would be written in large letters at the top of the screen. The voice prompts were extremely easy to hear. My truck may not be as loud as some, but my stereo is generally louder than it should be when I am driving along – but I could hear “her” telling me where to go just fine.
fnj – we are getting excited about the iQue, too. 🙂
delquardo – uhhhhh, I plead the 5th. 😉
Looks like there is a new Garmin coming out that may be easier to program and have an even bigger screen (and a bigger price tag) – but it is still transportable: http://www.garmin.com/products/sp2610_2650/index.jsp
Hopefully I will be able to review this one, too.
Judie :0)
My dad has one of these, and we used it in the UK to get from one point to another. I set it up, as he was driving, and everything was great. Of course, he wasn’t paying attention to the instructions, so naturally he turned off one road too early. I thought we’d have to redo everything, but the Garmin AUTOMATICALLY recalculated everything without missing a beat. I thought this was the coolest feature. Even when you mess up, it still manages to get you there.
Woud I get one for over here, sure, if they weren’t so darn expensive.
Note they are getting out of the proprietary memory card arena by using standard CF memory.
dequardo,
If the Garmin hadn’t been in the center console on the trip to Houston, the max speed would have been 123 mph 😎
Steve
I figured you were piloting at that point Steve 😀
Hey now! I broke 120 on that trip – and I am the one that got a speeding ticket for 93 in a 70 last year. 🙁
Anyone know of any really great radar detectors that I should review? 😉
Judie :0)
Yes. Valentine One is the ‘gold standard’ and historically ‘the best’. I would VERY much like to see an unbiased comparo between the V1 and BEL’s top line units. This would be very interesting to me and I hope to others.
I personally use a BEL 960 Vector and love it.
Mike
Mike,
The BEL 980/985 and the Escort 8500 are the best there are. I’m currently using a BEL 936 and hope to upgrade to the Escort 8500 or the BEL 980/985 pretty soon.
If you have never seen either of these sites before give them a look, they are VERY informative.
http://www.radartest.com/index.asp
http://www.radarbusters.com/support/product-tests/Default.asp
😉
Thanks Steve. I have looked at those in the past. I just question how truly unbiased they are. I suppose we could wait for Consumers Union to test them-yeah right!
FWIW, two of my brothers-in-law were talking about this very topic recently and they swear by the latest Escort Solo2 model.
Mike
Sorry to hear you got a Ford…
Myself, I’m a Toyota fan and I couldn’t love my 2003 Toyota Tundra I got a week and a half ago more than I do. Now, it has over 500 miles on it and I love driving it. I wouldn’t trade it for anything.
As for the GPS I see it as a way of getting lost with style. It is not always accurate, but it would be nice to have. The unit I’d love to see reviewed is the Emtac Bluetooth GPS Receiver with a Palm device with Bluetooth, and a Pocket PC with Bluetooth to see how well it works. I’m considering getting it for my TG50 and hopefully my soon-to-be HP iPaq 2215.
T1000X – I know exactly how you feel about your Tundra, one of our ranch trucks is a T-100. Even with 120K miles on it, it is always reliable and rides like a new truck. When it is time to replace it, we will so so with a Tundra. With that said, I still like my F-150 better. 😉 haha 😉
Let us know what you think of the EMTAC, if you get one before we get a review unit.
Judie :0)
The Tundra is an excellent truck, especially with the V8 Lexus motor that is in it.
We would have bought a Toyota if they made a Supercharged four door Harley Davidson Edition that produces 340HP and 425 ft/lb of torque.
I have done a few simple mods and it now produces 350HP and 435 ft/lb of torque with more to come….
It’s nice having one of the fastest vehicles on the road:D
I can attest to the performance of both radar units… I bought my 8500 from the sharper image a while back it was a very good radar but you will never know how important the Direction finder is unitl you use…
IMHO… it worth the extra $150!!! The first weekend I had it I was going over an overpass in on the freeway. I had just passed a cop pulling someone over and I started to speed up again when I noticed my V1 was still registering a bogey in front. Normally with any other radar, you would just assume that the cop has his front radar still turned on, and you could ignore the warning.
With the V1, I was able to know the there was another unseen bogey in front slow I keep it at a reasonable speed and within a mile I pass the second cop.
The V1 also has a remote display that is awesome! I placed the remote offset to the right above my steering wheel on my jeep’s dash. I drive a manual wrangler so with my left hand on the wheel I have an unobstructed view on the remote display. I have upped two photos to show what i’m talking about.
There are however two reasons why I did liked the 8500 over the V1.
1) the 8500 has a much better automatic muting inaccurate bogey’s. After 5secs? it will lower the volume for you. I supermarket auto door opener gets really annoying when you drive by it. The v1 is horrible at this.
2) 8500 has a text readout so at night I’m still able to figure what type of radar/laser that has caught me. I’m not too sure what the reasoning is but the V1 has a leds next to silk screened letters. This is fine in the day, but not good at all at night. Some you might say that should listen for the different types of sound… Oh to heck with that…
I want a text readout on my V1 or voice!
If you have any questions about either let me know! I love talking about toys!
I have a Sp3. I hope the new 200mhz processor on the new Garmin 2150 will make the screen refresh better. When you place the unit in Maxium detail mode it takes forever for the screen to refresh the map detail. I consider an ique but NAH!!! I’m getting one of those new Treo 600’s! i much rather have a Palm/ cell vs a Palm/ GPS combo!
hey Judie… you didn’t ever tell me that you are near houston. The next time you are in the SW area on Houston near sugarland. I’m the manager of the Radio Shack on West airport and 59S. Near the Sam’s Club
closeup V1 remote display
Dash View of V1 remote
http://www.pbase.com/image/19814161.jpg
http://www.pbase.com/image/19814131.jpg
OK, you got a lot of power, but what about handling?
A Pickup isn’t really designed for racing…
Tool,
Going waaayy off topic here, the Harley Ford F-150 is designed for racing in a straight line (1/4 mile), not on a road course. It is lowered 1″ and has 20″ rims with Goodyear low profile high speed tires and high performance shocks on it. It handles quite well for a 5,000 lb truck. It could still outhandle most cars on a road course though.
The sister truck to the Harley is the Ford Lightning, it has the same motor, tranny and suspension as the Harley but is a two door version and hence, a lot lighter. With just a few mods that would cost no more than $1-2K, the Lightning can acheive 11-12 second 1/4 mile times and the Harley 12-13 second 1/4 mile times.
I’m sure you’re aware the Lightning 1/4 mile times would beat ANY production sports car on the road, including the Z06 Corvette ($53K), Viper ($75K), Porsche 911 Turbo ($120K), etc. Those cars cost 2-3 times the price of a Ford Lightning ($33K) or Harley ($39K).
This isn’t your father’s pick up truck. I’m a member of a Harley F-150 website and we have two members that live in Sydney that have the same truck we do. There are atleast ten 2003 Harley Davidson F-150’s in Sydney, Australia that I am aware of. If you happen to pull up next to one at a light, rev your motor and see what happens.
To be better informed, read these reviews on the Ford F-150 Harley and Lightning and their high performance capabilities;
http://www.truckworld.com/Truck-Tests/02-2002F-150HD/02-harley.html
http://www.pickuptruck.com/html/2002/ford/harley/roadtest/page1.html
http://edmunds.com/used/2002/ford/f150/100002498/roadtestarticle.html?articleId=78384&tid=edmunds.e.roadtests.content…Ford*
http://www.elepent.com/review.php?nr=529
http://www.commondriver.com/t01foligh0414.asp
http://www.canadiandriver.com/articles/jk/03lightning.htm
http://www.elepent.com/review.php?nr=238
http://www.thecarconnection.com/index.asp?article=3236&n=157,275&sid=275
Steve
Unfortunately most road I drive have bends and curves…
While drag race capabilities are cool in a fast and furious kind of way, they are also pretty pointless IMHO.
did some research and found this website:
http://www.syclone.freeserve.co.uk/rivals.htm
Didnt see your lightning in the list though 🙁 But I think the Mc Laren F1 and the (also missing) Ferrari Enzo will still beat it..
At a much higher cost I agree…
<edit> the F150 is in the list (the 1999 model but it is not nearly as fast as you claim..
Haven’t seen any of them (hardly any of the american F series trucks here, mostly ford and holden utes or toyota 4WDs.
I’m sure the F150 will be faster than my Forrester (which is probably half the price). But on a point A to B race I’m sure a Impreza STi or a Skyline will blow the F150 out of the water…
Don’t get me wrong, I agree the F150 are cool cars, I just cant see them as sports cars…
Boy…did we get off topic here…let’s rein it back in… 😉
Judie :0)
Uh-oh ToolkiT, looks like we may have to move this topic to the General Discussion area or to Private Message:cool:
The Lightning motor was redesigned in 2001 so the 1999 figures are dated. Here is another website with more accurate info;
http://www.pickuptruck.com/html/2001/ford/lightning/first_drive.html
In this article a stock 2003 Lightning runs a 13.7 in the quarter mile and has a 146mph top speed which would move it up that list quite considerably. The Harley probably isn’t included on the list because it wasn’t equipped with a Supercharger until last year (2002).
http://www.trucktrend.com/roadtests/pickup/112_0306_spdlight/
I said in my previous post that a Lightning or Harley with $1-2K in performance modifications can acheive 11-12 second 1/4 mile times, that would put the Lightning and Harley towards the top of that 1/4 mile list, pretty impressive company. The majority of the upper portion of that list is comprised of motorcycles, they shouldn’t even be included on a list with cars. Here is the car only list;
http://www.syclone.freeserve.co.uk/rivals_cars.htm
I wouldn’t even try to compare a $33K truck to the McLaren F1 that costs $1 Million dollars and the Enzo Ferrari that costs $500K, and good luck finding one of those cars for sale if you can even afford them.
The Lightning and Harley both are indeed world class sports cars (trucks) and the many links I have provided prove that. Just don’t challenge one to a race, because you may be embarrassed. We have never drag raced our truck, but just knowing we have the ability to blow the doors off most cars whether it be on a drag strip/straight line or a curvy mountain road is quite nice.
I’ll be happy to continue this topic either via email, Private Message, or the General Discussion area:D
Ikwan,
The Valentine One is ranked among the Top 5 radar detectors in the world and is a good unit. The Escort 8500 and the BEL 985 are the best though, and at a $100 cheaper than the V1 you simply can’t beat them.
I do like the direction finder on the V1, that is a helpful feature. Even better is the remote concealed display the V1 offers as an option. If it were included in the $400 price I would seriously consider purchasing it.
https://store.valentine1.com/store/
Mea Culpa..
Nah, lets just agree to disagree on the defenintion of a sportscar..
The F150 is a very nice piece of machinery though…they are just not my ‘cup of tea’…
last question what is the power to weight ratio on one of those things?
What is the world coming to? :rolleyes: Do people really need a GPS to drive. I don’t even need one to fly a plane hehehe. But it definatly helps 😎
You sound like my wife, she claims she is the GPS system in our car 😉
She actually does a great job navigating 🙂 (dont tell her I said that, otherwise I never can justify an iQue 😉 )
Let’s face it…GPS was created so men would never have to ask for directions! :rolleyes:
Judie :0)
LOL@judie 😀
Tool,
Sounds good. You got me on the power to weight ratio, haven’t seen those numbers yet.
Too bad you’re Down Under, I would love to take you for a joyride in the Harley and show you it’s capabilities, I bet you would change your thinking:D
Take care;)
Steve
Directions!?!?! We don’t need no stinking directions!
The word “lost” isn’t in my vocabulary;)
hi,
i had the garmin spIII in my car before going to an aftermkt pioneer unit. spIII is half the price and portable.
my pioneer and i imagine most indash units are easier to input data and calculate/recalc sooo much faster. also cleaner install. look mom, no wires.
again thx for more car gadget reviews! soon ull be talkin underglow kits and turbos.
lata
p.s. 1/4 mile in 12-13 for the 2 1/2 ton truck w/ 450tq seems to be overstating a bit. tho, i wouldnt put my pinkslip up against it.
LOL… I’ll have to send you a video clip about why men don’t ask directions.
Seriously, I know my way areound town pretty well. If someone is on the phone asking for directions, they usually hand the phone to me. Using GPS has only enhanced this, but there are times while on the job I’ll have to fix someone’s network at a location I’ve never heard of, and all I’ll get is the address.
Fortunately, I don’t have to go through the 25+ steps you mentioned on the product I’m testing. Just tap “navigation”, then “find”, then write the street address for the destination. It will map your route about 10 seconds after the GPS is locked.
Depends on the gearing, but it is pretty good. I used to run the brackets at Detroit and Milan and got into the upper 12’s in a 2800 lb daily driver. Of course it was bretty laid back (stock short block, cast crank, 5500 rpm redline and automatic), but the whole car cost less than $3000 including the original purchase price.
Just so this relates somehow to the article, it did not have a GPS.
Altema,
That was a very good save! 😉 I think Steve is going to start a thread under general discussion (if he doesn’t, I will) so that those who want to continue debating whether this car will beat that truck can continue…fwiw, I just watched a video of a Ford Lightning doing an 11.4 second quarter mile…heady stuff!
Judie :0)
Judie, how long does it take to create a new route if you go off course? 10, 20, 30 seconds?
Also, can you select the voice? I prefer a woman’s voice anyways, but was just curious.
Unfortunately, I don’t have the SPIII anymore (I had to send it back 🙁 ), but as I recall, it wasn’t much more than 10-20 seconds for recalculation.
You don’t get a choice of voices, a woman will tell you where to go. As it should be. 😉
Judie :0)
Well, I failed…
I failed in getting the Garmin or the Emtac units, and I also failed in another area.
My Dad has been looking at new trucks longer then I have (I had pretty much decided many years ago, that if I could get a fullsize truck, it would be the Toyota Tundra) and he got a Ford this past Thursday! GAH! My Mom and I feel like we both failed. I even offered to pay my Dad $5000 cash if he would get a Toyota! My Dad chose the F-150 XLT with Triton V8 engine. A sad fact is my Dad, who is – shall we say – gadget illiterate, will never learn how to use all of the little features of his truck.
As for my Toyota Tundra, it is one of the new ones with the Lexus iForce V8 engines. It is a great performer, has a smooth ride for a truck, and it has the TRD package but no 4×4. I have yet to take it off-road to see how it will do. I’ve even considered adding a supercharger and see if Toyota would install it so it would be covered by warranty. I may even add a GPS system to it, which one (Emtac, Garmin Pilot series, or Gamin iQue) or how to install it, I haven’t decided. I think I’ll just add a generic PDA pedestal mount with charger for the PDA at an easy eye level, and get the Emtac or other Bluetooth GPS unit when it’s price drops.
As for Toyota (and back to being completely off-topic), they are releasing on an extremely limited basis full ton Toyota Tundras running 5.5L V8 engines. They look like any other Toyota Tundra. I don’t expect Toyota to sit on their laurels for long. I see them becoming highly competitive against Ford, mainly, and coming out with versions of their Tundras or new models to compete with all Ford truck variations. This includes their own sport truck variant, similar to or better equipped then the Ford F-150 Lightning. Later this year, they are coming out with the Tundra Double-Cab (about time), with a bigger, deeper bed.
Hi Judie,
I recently bought a Garmin Street Pilot III, Deluxe Package (Nov. 2003), and am very staisfied with the results I’ve had so far.
I wish I had seen your review of the Street Pilot III before I bought it. The reason for that is, Garmins Instruction manuals are too fragmented and difficult to follow for the uninitiated in high tech Gadgetry. It bounced you back and forth to the point of utter confusion. While I eventually got the hang of it, if I had read your review at the beginning I would have saved a lot of frustration and satisfaction would have come sooner. I strongly suggest that Garmin write their manuals in step by step format for each feature and give the new users the comfort level needed for the common dunce that probably will be their best prospective customers. You seem to have done it a lot better than Garmin did.Bravo!
I had experienced a few failures of the program to locate several addresses. I learned that my unit was packaged for distribution a few months before the new upgraded “City Navigator” Version 5.0 disk was ready for packaging with the GPS Units. Mine came with Version 4.01. I learned about the upgrade from the Garmin web site and called their Tech Support. They readily agreed to send me the new 5.0 Version at no charge. It made a difference, but there are still some addresses that I could not find a match for and had to resort to settling for a “City” location only. Most of the time you can get through with “City” information only.
The biggest negatives in my mind are the unit price, a little too expensive, and their Data Card prices are outrageous.
I learned that the new “2610” uses non- propriety” data cards that are much lower in price and can go up to over 500 MB. The new 500MB card sells for less than half the cost of the
Street Pilot III 128 MB card. I feel Garmin should give their Street Pilot customers a break on this accessory.
In spite of the negatives, I’m impressed with the performance of my unit and amazed at it’s accuracy when you have a 100% match. Most of the time it brings me to my destination within 40-50 feet, and tells me which side of the street my destination is on!
I’ll be using my Street Pilot III for a long time.
A side note: I don’t think it’s any body’s business what kind of truck you or anyone buys. Your review was on the GPS not the truck. I wonder why the “critic” was so taken back by your including it in the review, maybe a bit of jealousy? No matter, I think the review was great.
Phil
Why do people keep saying I’m jealous of Judie’s truck? I’m not! I’m glad she has it, if some people are Harley fans, thats great. I just personally thought she mentioned it a bit too much. Why couldn’t she say 2001 Ford F-150? That just me though. Again, I’m tired of people saying I’m jealous. Just to prove it, heres a little on my truck. Its a 2001 just like judie’s, its also a Ford F-150 Supercrew, just like Judie’s. But instead of being a Harley Davidson Edition, mine is a Lariat. And just like Judie’s it has leather too. But this is so off topic, its not even funny. I personally bought one of these Garmin units because of Judie’s review. So, thanks Judie for a great review, and I hope your truck provides you and your family with many years of trouble-free performance and comfort!
Jeez! If it is any consolation to everyone involved, I have since traded my gas guzzling truck for a Mini Cooper S!
Flame on… 😉
A Mini Cooper? Rock on Judie! Do you ever feel like your in the movie “The Italian Job”
That movie is what pushed me off the fence. 😉 Fun stuff!
Just got a used one. Wondering though – the Garmin GPS 195 & 295 used for aviation have the ability to also show land and marine modes as well as aviation and the units, externally at least, are identical to the Street Pilot III even the input buttons. Is it possible to do the reverse and convert the SP III to also work in the aviation mode?