Product Requirements:
Device:
Windows 98SE or higher
Mac OS 8.6 or higher
When I found a USB 2.0 to IDE cable in a package of other review items that I had received from Brando’s Workshop, I had to wonder when and if I’d ever be able to actually review it. According to the packaging, this product would allow a person to connect an IDE device to a computer via USB. At the time I wasn’t in the market for a new hard drive, CD-Rom, CD-RW, DVD-Rom or DVD-RW, which are what this device is compatible with. I didn’t relish the thought of cracking open my homebrew Athlon desktop to test with one of my current drives, and I didn’t feel like going out and buying a new device just for a review. So, I put the box in my pile-o-stuff and hoped an opportunity would present itself. Wouldn’t you know it, about 2 months later I would be thanking Brando for sending me this product…
I had been promising my sister that I would upgrade her ancient 400mhz Pentium desktop to something nicer, for a long while. Since I had just purchased an Apple 15" G4 Powerbook, I decided that my Fujistu Lifebook (a.k.a. Mini-me) was no longer needed and decided to make it a gift to her.
Of course, she was thrilled, but at the same time, she asked how we could transfer her emails, pictures, documents, etc. from the old computer, to the new computer. I said "no problem…" and packed a gear bag with several tools before heading over to her apartment.
The tools I took along with me were:
CR-T3-U26 USB 2.0 6-in-1 Memory Card Reader
VICTORINOX CyberTool 34
USB 2.0 Data Link Cable (another product that Brando sent… review to be posted soon)
USB 2.0 to IDE Cable
It had been awhile since I worked on her computer, and once I got there, I remembered why I hated working on it. For one thing the CD-Rom didn’t work. If that wasn’t bad enough, it was running Windows 98. ACK! No SE here folks… That means, no USB. My idea of just plugging in the card reader and copying the necessary files to it for transfer was blown out of the water quickly. So was the idea to use the USB 2.0 Data Link cable between the two PCs. Luckily I had the USB 2.0 to IDE cable to try out!
Using the CyberTool, I opened her computer case, unscrewed the first hard drive (she had 2 of them) from the mounting bracket, and then took a closer look at the USB 2.0 to IDE cable instructions. Since the Fujistu notebook was running Windows XP, no driver installation was required. A mini CD is included in the box if you happen to be running and older version of Windows or Mac OS.
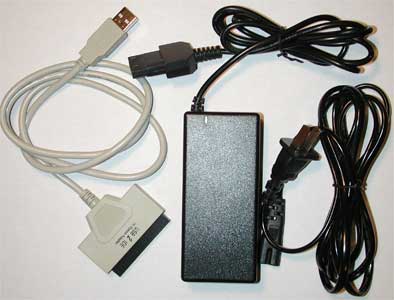
Basically the cable has a female 40 pin IDE connector on one end and a standard sized USB connector on the opposite end. The total length of the cable is 39 inches. Here are the specs.
Hardware Specs:
Fully supports USB 2.0
480Mbps high speed data transfer rate
Supports Hard Disk, CD-ROM(max. 52x), CD-RW, DVD-ROM, DVD-RW, Combo device
AC Power Adapter input : 100 ~ 240V, 50/60HZ, 2A
AC Power Adapter output : 12V/3A, 5V/2A
The only important step in the included instructions (a small folded piece of paper) is to make sure that you set the hard drive to Master mode instead of Slave mode. By default, hard drives tend to be set to Master mode. This is especially true if you remove one from a system with only one drive. In this case, I had two drives to contend with, so I had to pay attention to the jumper settings on the drives.
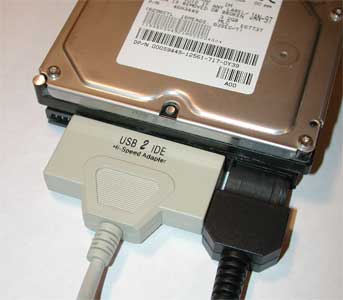
Once I made sure I had the mode set correctly, I attached the cable to the IDE port, attached the included AC adapter to the hard drive, plugged in the AC adapter to a power outlet, and then plugged the USB connector into the Fujistu notebook. I was a little worried since I knew that the Fuji didn’t have USB 2.0 ports. I didn’t know if that would make a major difference or not… A few seconds later, the notebook detected the new hardware and the drives appeared under the My Computer drives list. Cool!
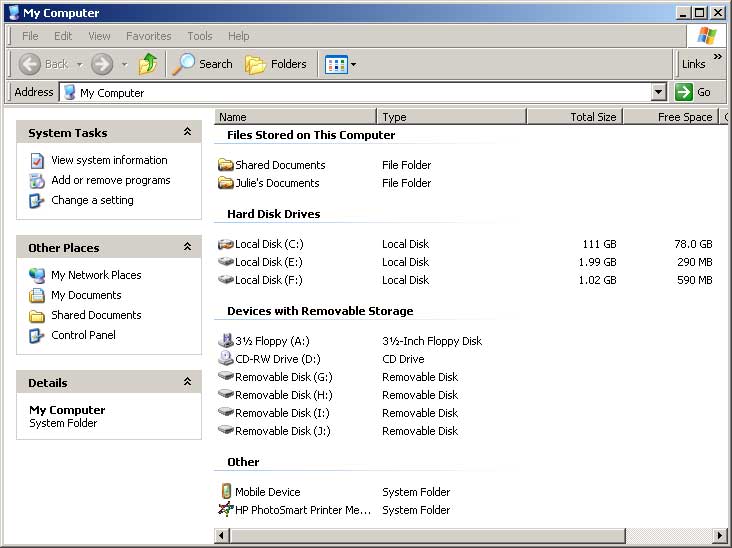
The drives show up in the Hard Disk Drives list. Here they show up as E: and F:
From there, I was able to copy all of her files files from the hard drive to the notebook via a simple drag and drop operation. She was pretty impressed!
After I finished copying the files from the first hard drive, I put it back into her system and then removed the 2nd hard drive. I repeated the same hook-up steps, but this time the drive was never recognized by the notebook. I could hear it spin up, so that wasn’t the problem. I could put it back into her computer system and it worked fine…
I ended up bringing the drive home to try out with my Athlon desktop since it does have USB 2.0 ports. Unfortunately, when I connected it to the desktop, it was never detected either. I tried it on my Powerbook and had the same results. However, when I plugged the drive directly into my desktop’s IDE cable and power cables, then rebooted the system, it showed up just fine. At this point I was pretty sure there was a problem with the cable. But then when I went to take pictures for the review, I plugged in the cable and noticed that that the power plug was a really tight fit. Then I saw that I had the cable plugged in so that one end of the connector was not in contact with one set of the pins on the hard drive. OOPS! After I took the pictures, I plugged it into my PC and badda boom badda bing! It worked perfect! The moral of this story is to pay close attention to what you’re doing… ;o)
This product is handy for the purpose outlined here, as well as for system expansion. Using the USB 2.0 to IDE cable, you can easily add extra storage or capabilities to a desktop or notebook system without the hassles of opening cases and futzing around cables. I’ll be keeping it around just in case…
Price: $32.00
Pros:
Easy to use
Inexpensive way to add storage to an existing PC
Cons:
None

GMKtec Mini PC, G3 PRO Intel Core i3-10110U (Beats 4300U/N150), 16GB DDR4 RAM (Dual Channel) 512GB Storage Drive, Desktop Computer 4K Dual HDMI/USB3.2/WiFi 6/BT5.2/2.5GbE for Office, Business
(as of June 9, 2026 01:13 GMT -05:00 - More infoProduct prices and availability are accurate as of the date/time indicated and are subject to change. Any price and availability information displayed on [relevant Amazon Site(s), as applicable] at the time of purchase will apply to the purchase of this product.)
KAMRUI Pinova P1 Mini PC Computer, AMD Ryzen 4300U (Beats i3-10110U/3500U), 16GB RAM 256GB SSD, Mini Desktop Computer Support Triple 4K, USB-C, WiFi, Bluetooth, Ethernet for Business, Education, Home
(as of June 8, 2026 13:52 GMT -05:00 - More infoProduct prices and availability are accurate as of the date/time indicated and are subject to change. Any price and availability information displayed on [relevant Amazon Site(s), as applicable] at the time of purchase will apply to the purchase of this product.)Product Information
| Price: | 32.0 |
| Manufacturer: | Brando |
| Pros: |
|
| Cons: |
|
Gadgeteer Comment Policy - Please read before commenting
Post your comments here on the USB 2.0 to IDE Cable Review.
http://www.the-gadgeteer.com/usb2ide-review.html
Just click the POST REPLY button on this page.
Hmmm, I wonder if rtvpatch will recognize it….could get a couple of them and then get around to upgrading some of my RTVs.
My SFFPC doesn’t have the support to connect two more drives to it….so I was thinking firewire, though I’ve been looking at external enclosures….which aren’t as simple….and a touch more expensive.
Though the SFFPC I have doesn’t do USB 2.0….so it’ll probably make for a slow upgrade. But, only need to do 5 of them (plan to turn all 5 of my RTVs into 250G units :wow:, unless during the process drives continue to get cheaper…and I opt for a 400G here or there. )
Some how still need to fit those plans with the other plans for this year….like finally replacing the 21″ TV (probably only a 43″, unless at the last minute I spot a 50″ [table top style] for similar price without side speakers…..since the opening in my stand is about 43″ wide.) And, then all the other upgrades that will trigger…like an upconverting DVD player (skipping [just] progressive :confused: ).
Wonder if anybody makes a DVI/digital audio auto A/V switcher yet…..
More recently added to my list….a new bed….a Select Comfort….that’s a gadget right 😀
The Dreamer
5 250gb ReplayTVs? WOW! I bow in your general direction 😉
Does this work with Mac OS X?
In any event, this suggests a solution to a problem I’ve had for a while. In order to do backups, you can buy expensive (and slow) tape equipment, or now that disk drives are so inexpensive, you can buy disk drives. However, to use drives, you need an enclosure. I’ve been using one of those “mobile rack” devices inserted into a Firewire/USB enclosure, and each disk is put into a tray which fits in. This is expensive, and does not always work. Also, the rack extends out of the enclosure.
Using a cable like this, connecting cheap disk drives for backups should be quite easy.
Does this work with drives over 120 GB?
Yes, it is supposed to work with Mac OS. I didn’t test it after the first failure though. I’m not sure what the drive size limit is though. The documentation didn’t mention a size limit.
Is this because the rack assembly is bigger than what the enclosure was designed for?
I was actually wondering if I could get mobile racks to go in an enclosure….given that I haven’t been able to find enclosures that come with the mobile racks included (though I was thinking this was because the company’s hadn’t considered that anybody would have a need to put a mobile rack into a portable drive case….:rolleyes: )
Some people at work swap racks around as their backup system….I brought my old DLT4000 into work, to backup my work machine. One person goes as far as taking one of the disks home….to have offsite. I’m not that concerned about work data though….given that until recently the office offsite backup went putting the tapes in a safety deposit box in the bank across the street. Thinking that if a tornado took out the office it would be selective enough to miss the bank?
The tapes are in a bank further away now…but through no action on my employer’s part. The branch was closed as a result of the latest string of bank mergers. 4th one to affect that brach that I’m aware of (and I’ve only been here for 6 years).
The Dreamer.
Will it work with Linux?
—
Manny
There isn’t any mention of Linux in the brief user guide. Can Linux support USB storage devices these days? If so, I would be somewhat optimistic that it would work with that OS.
I received the USB 2.0 to IDE Cable this week and it was defective. I sent an email to Brando and I am now waiting for a reply. I ordered products from this company before and never had any problem. Hopefully this would not turn out to be an unpleasant experience.
I will keep you posted.
Update:
USB.Brando.com.hk replied within hours. They said they will send me a replacement unit. Great service! I will post an update when the replacement unit arrives.
Just received a replacement today (1 week after I reported the problem) and it is working perfectly! I am happy to report that Brando.com is behind it’s products and responses quickly. I will definitively continue to be their loyal customer.
Did the cable not work at all? Did you make sure you didn’t do what I did… not having the connector lined up with all the pins?
Julie! Great review! 😀 I bought the cable right after reading your review. This cable is fantastic! I feel like a kid in a candy store. :wow:
I just got it working in Linux. I’m running Redhat 9, though the distribution should not matter as much as the kernel that you’re running. In my case, I have a custom kernel and had to manually load the usb-storage module. I also read you had to load the sd_mod module. It’ll appear as a scsi device (for example /dev/sda).
So, here’s the process I went thru to get it to work for my system (other systems might be a tad different, but the idea is still the same). My external hard drive was already partitioned and /dev/sda1 was formatted with Reiserfs. /mnt/usbstorage was the directory where I wanted to mount.
1) plugged in the drive as Julie has in the picture
2) made sure the jumper settings are set to master for an ide device
3) as root ran: insmod usb-storage
4) as root ran: insmod sd_mod
5) mkdir /mnt/usbstorage
6) mount -t reiserfs /dev/sda1 /mnt/usbstorage
Finally, you might want to check /var/log/messages to see that the drive was recognized, etc. In my log I was able to see the vendor and model number of my drive.
I hope this helps one of your readers as your review has helped me.
XiGua:
Glad to hear that the product worked out for you! 🙂
Thanks for the Linux instructions.
Has anyone try using this product with a dvd-rw drive? It would be great if it does, and I’ll be able to bring my burner everywhere.
Does anybody know if the cable supports 250gb hard drives?
arogan:
I couldn’t see why not, it is basically a Hard Drive enclosure without the enclosure part, just the cable. I wouldn’t recommend this as a permanent solution, I think an enclosure would be a better solution, because of the circuit board on the bottom of the drive. I’d be afraid it would get damaged.
The reason I ask is it is completely depending on the bridge chipset used to convert IDE -> USB.
The older standard only supported 28bit LBA allowing you to only address a maximum of 137gb. You’ll see this with older motherboards too like those based on kt266 or good old 440bx.
Most newer chipsets support 48bit LBA allowing you to address up to 144 petabytes.
http://www.48bitlba.com/
I believe most of these types of devices today (including external enclosures) support 48bit LBA but it’s always nice to ask and be sure.
I would agree this is not a good solution for a permanent setup but for quick testing or if you need ultra portability it would be perfect.
I just bought one of these, and am having trouble getting it working. I tried it first with a 120 GB drive, not recognised by WinXP, so I then tried a 13 GB drive, an old one that I was not using any more, and it recognised it okay. So then I tried a 60 GB drive, and that was not recognised either.
So, could it either be faulty, or just incapable of recognising anything over 13 GB or whatever the limit is that is below 60 GB?
I found the manufacturer’s website quickly through Google at http://usb.brando.com.hk/usbtoidecable.php but there is no info there about the hard drive limitations. I bought the device itself on eBay.
Are you making sure that you have the connector correctly attached? I’m not sure how closely you read my review, but I had similiar problems till I realized that I had the connector off by one set of pins.
Thanks, that must have been it. I re-read your review and had previously not noticed that bit at the end, as I kind of rushed it a bit, looking for a limit to hard disk capacity more than anything else.
So now it works, I have attached a 60GB drive to it successfully which is recognised in Windows XP. I have other USB 2.0 enclosures, different types to this one, one with a 160 GB drive, one with a 120 GB drive, both work well too.
I was using before a firewire enclosure but I think the electronics on that were faulty, hence I bought this USB to IDE adapter, so am reusing the firewire enclosure with its IDE to firewire electronics ripped out, and the USB adapter plugged in directly to the internal IDE drive.
I asked Brando who manufacture this what capacity limit there is, their reply verbatim:
——– Original Message ——–
Subject: Re: USB to IDE
Date: Thu, 12 Aug 2004 22:18:00 +0800
From: usb.brando.com.hk – Delta Global Crew <usb>
Hi,
I haven’t limit for the capacity. It supports all knid of IDE HardDisk.
B.Regards,
Joe.
—————————————
So I am guessing it must use the 48 bit LBA to have any capacity of IDE drive currently manufactured to fit it.