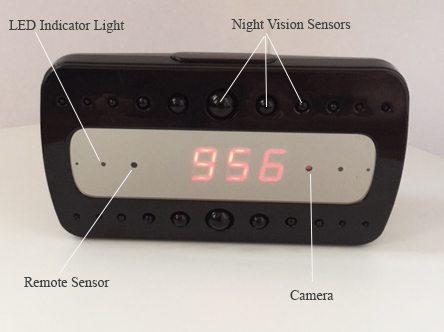
Have you ever wondered what the babysitter is doing while you’re gone, or maybe you have a loved one in a nursing home and you think the care might be lacking? If so, then this little spy camera may be just the thing for you. Disguised as a mini alarm clock, this 2.2″ tall by 4″ wide little gadget has a 1080P HD motion activated camera with night vision! I was intrigued by the description on the box, and couldn’t wait to see what this baby would do.
DON’T MISS: Zone Shield WiFi Bluetooth speaker with spycam review
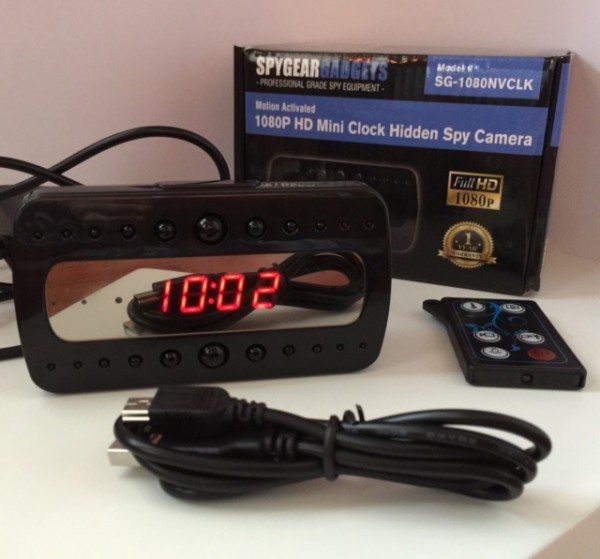
What’s in the Box (check out the pic above)
-1080PDH Night Vision Alarm Clock Camera
-USB Connection Cable
-IR remote Control
-AC wall Charger/Power Cable
-User Manual
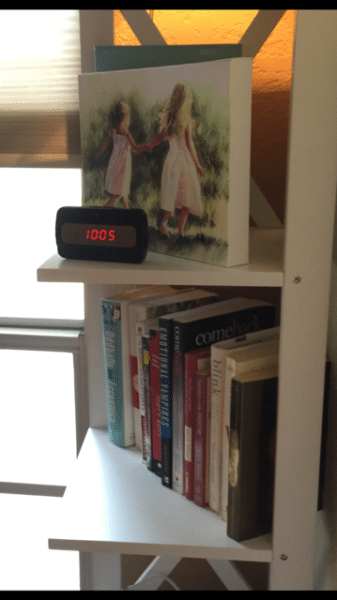
After taking it out of the packaging, I was surprised at how small it actually was, and how light it was. Right out of the gate I was able to set the date and time with no issues, and get it charging. The default setting for the clock is military time, so if you want to disable that you just need to press the “up” arrow on the back after you’ve set the time. There is no AM or PM on the display, so you may not be aware that it’s in the wrong format until after 1:00 PM when it says 13:00. When the clock is set, it flashes back and forth between the date and the time. I was looking for a way to disable this, as I wanted the clock to draw as little attention as possible, and the blinking makes you look at it twice. I could not find a way around this, so I guess it will have to do! Just looking at the clock you don’t see any other lights, or any reason to think that it may be anything other than a clock, so it just may be ME overthinking it. I think it looks like it belongs on my book shelf. Moving on…
Recording video
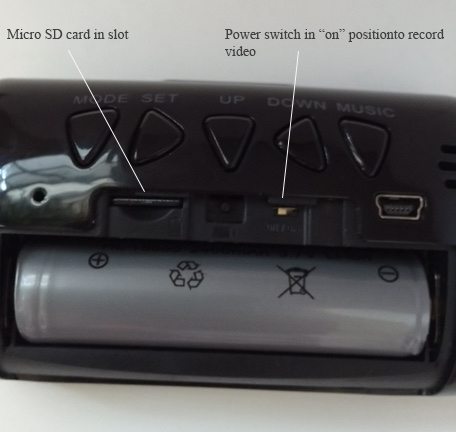
In order for the clock to record video, you have to install a micro SD card into the back of the unit. The back cover slides off and there is a tiny slot for it to click into. You’ll also notice there is a small white switch right next to it that needs to be slid into the “ON” position (See pic below).
After placing the back cover on again, the clock is all set to be positioned where you need it. After it’s in place, you can decide if you’d like to record continually, or use the motion detector. If you record continually and don’t have it plugged in, you’ll get about 8 hours of recording. The camera automatically saves a new file every 5 minutes while in continuous record mode which is nice because who would want a HUGE file to have to dissect. If it’s plugged in, it will continue to record, deleting the oldest files as time goes on. The size of your memory card will determine the actual amount of video you will have at one time.
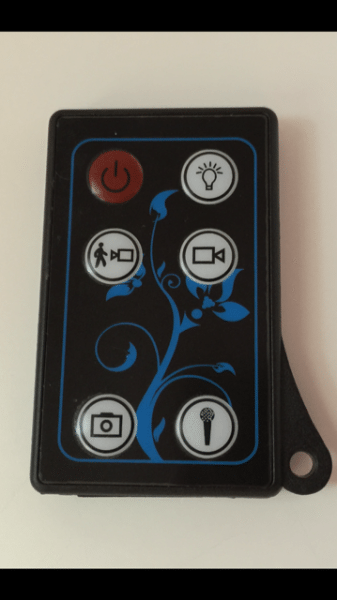
To begin recording, you must use the remote and press the power button (the red one in the upper left of the pic above) you will see the LED indicator on the front of the clock blink three times, then it will stay blue. This lets you know that it is ready to record. Note: If you see the blue light blinking fast and it doesn’t stop blinking, this means that you forgot to put the mini SD card back in! Now you need to choose either motion activation, or continuous recording (one of the two buttons in the middle row of the remote). I like to record in the motion activation mode, which is the button with the stick-person next to the camera, that way I will get more action on the camera, instead of a lot of down time when nobody is home, or moving around. After pressing the motion button, the LED indicator on the front will blink three times and go out. Pressing it again returns the camera to standby mode, and the light will be a constant blue again. I have no idea what the two buttons on the bottom are for. I assumed the camera-looking one was for taking a still image, but I tried to push it and nothing happens. The microphone I assumed was for controlling the audio function, but again, I tried it and it does nothing. But, since it’s defaulted to use audio, there isn’t really any need for it unless you’d like to turn it off…in which case, you are out of luck. There is no mention of either of these buttons in the manual.
Video Quality
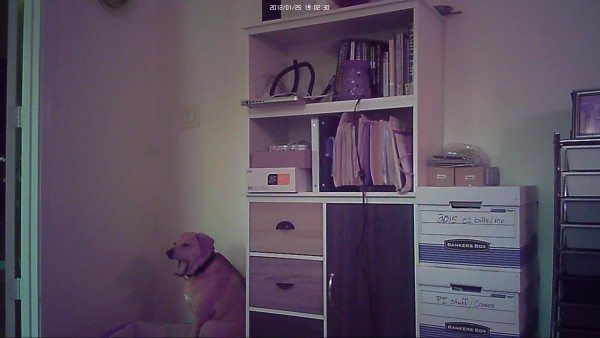
I was very impressed with the video and audio quality of the clock. The daytime video was great. Here is a pic of my dog Bentley, who seems to be less than thrilled to be my test subject. This is a snapshot from a video on a cloudy day, with no lights on in the room.
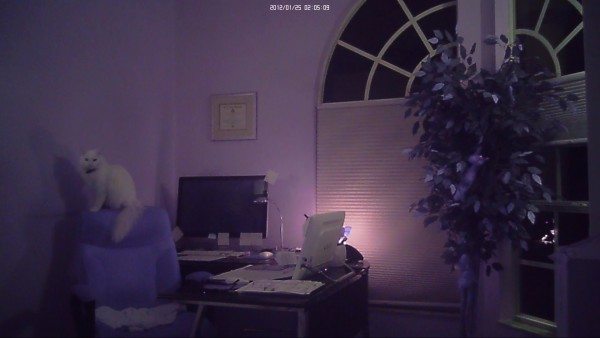
The night time video with a few lights on is excellent as well. Note: You must be sure to press the button on the remote that looks like a light bulb (right next to the power button) to enable night vision! I did this every time I set it up to record because I wanted to make sure it was on. The blue LED indicator will blink one time letting you know that it’s on, but it goes off, so it’s easy to forget if it’s on or off. Below is a snapshot from a video taken in my office with one lamp on in the corner, and a salt crystal lamp illuminated on my desk. You can see it’s very detailed and Elsa the cat can be seen quite clearly at a distance of about 9 feet away perched in her usual spot on the back of my chair. Oh, and look at all those sticky notes…someone (okay, it’s me) needs to get her work done!
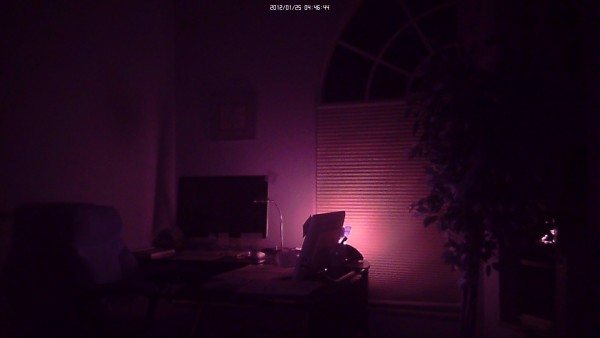
I turned off the lamp so that the only light on was the salt lamp and here is what can be seen. I would not recommend trying to get any incriminating or detailed video unless you have other lights on in the room you are monitoring, because you will have trouble identifying a subject or seeing what’s going on at all…even with night vision on.
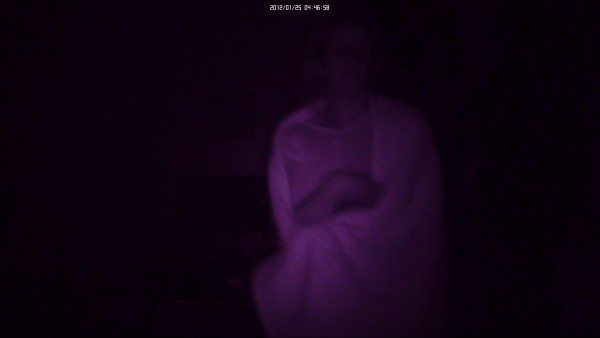
The next snapshot is from a video taken with the room completely dark. As you can see, the subject is barely visible, and is roughly 3 feet from the camera. You can’t see the face at all, and you can barely tell that she (okay, it’s me) is wrapped up in a blanket and walking toward the camera. You can see faces with night vision, but they have to be VERY close. So, if you are planning to catch someone, or something happening at night, you must make sure that the night vision is turned on, and that the action happens within three feet of the camera/clock. From my usage of the device with night vision, placing it on a shelf to monitor a whole room is not very effective in the dark. If you want to get faces, the clock needs to be placed the same height as a face, or you will just get chest shots with night vision. If you look at the pic below, once I was right next to the camera, my face was above the camera, but you could see my arm very well.
One other thing to note is that the video does display the date and time in the very top. It’s very hard to see from the snap shots of the video I have posted here, but if they are full size it is very good quality. However, the date and time displayed on the clock, is not the date and time that will be displayed in the video playback UNTIL you follow these steps:
- Make sure the SD card is inserted in the back as stated above. and press the power button on the remote, then press it again to turn it off.
- Connect the clock to your computer using the USB cable provided and open the drive as if you were going to find data on the memory card.
- Locate the file in the directory called “userconfig.txt” and change the date to the correct date. The file would look like this: 2016-01-26 10:30:00 Y
- You must be sure the last letter is a Y and not the default which is N because this is what tells the camera to update itself with the new time stamp you just entered
This information will be particularly helpful for someone who plans on using this information to support a lawsuit or for any private investigators interested in using this device to collect evidence. Having no date or time, or the wrong date and time on this footage will be useless.
Viewing the video
There are two ways to view the video that has been recorded. You can use the USB cable provided and download and/or view the files directly from the camera/clock, or you can take the micro SD card out, put it in an SD card adapter and put it into a card reader and view files as you would from any other camera.
All in all, I thought this was a great little product. You could use it professionally if you are a PI, or I can think of lots of other times it would come in handy. I was just thinking you could take it on vacation and actually use it as an alarm clock, as it does have that function as well, then you could set it to record what happens in your hotel room while you are away! It doesn’t have the best 100% dark night time vision unless you are very close to the camera, but the daytime and low light recording is excellent. It was a little difficult for me to get used to not knowing what mode the camera was in because there is no light that stays on letting you know. With that being said, if there was a light that was always on, someone would wonder what the light was and become suspicious of the device. It’s very covert by design and functional if you learn the proper way to use it. I would recommend this product for people who want an easy and effective way to see what’s going on when they can’t be present.
Source: The sample for this review was provided by SpygearGadgets. For information visit their website and Amazon to order.
Product Information
| Price: | $87.99 |
| Manufacturer: | SpygearGadgets |
| Retailer: | Amazon |
| Requirements: |
|
| Pros: |
|
| Cons: |
|