Product Requirements:
Device:
Microsoft® Windows® 98 / 98SE / Me / 2000,
Professional, XP Home and Professional, Macintosh® OS 8.5.1 / 8.6 / 9.0 / 9.1 /
9.2, Mac OS X 10.0 / 10.1
I’m sure you’ve heard the old saying, "good things come in small packages". I’d
have to say that is certainly the case with the diminutive
Sony Cyber-shot DSC-U20 digital camera.

I was recently in the market for a very small digital camera that I could
take along with me on a vacation to
Scotland. I knew I’d probably be sight-seeing 8hrs a day and I wanted
something that could take very good pictures while remaining small enough to fit
inside a jacket pocket. I also didn’t want to pay an arm and a leg for it. I
wasn’t in the market for a camera to replace my Nikon Coolpix 990. Rather, it
was to be a camera that I’d end up carrying with me every day in my gear bag. I
looked at several small cameras but ultimately chose the Sony DSC-U20 based on
its price and size.
Before I go any farther, I want to point out that I’m a picture snapper and not
a real photographer. As such, this is not going to be the type of review that an
actual Photography site would post. I’m not going to get freaky about aperture
settings, and the like. I’m an auto focus girl all the way! Good thing too,
because the U20 has very few settings that are user modifiable… That said,
let’s begin with the specs.
Hardware Specifications:
Imaging Device: 1/2.7" 2.0 Mega pixel Effective Super HAD™ CCD (2.1 Mega pixel
Gross)
Recording Media: Memory Stick® Media
Zoom: 1X
Focal Length: 5.0mm
35mm Conversion: 33mm
5mm (33mm 35mm equivalent) f2.8 lens
Aperture: f 2.8
Focus: 4-Step Manual Preset with Auto
Minimum Focus Distance: 7.9" (0.2m)
Macro: Selectable
Shutter Speed: Auto (1/30 – 1/2000)
Manual Exposure: N/A
Color LCD: 1.0" 64K Pixels TFT Reflective LCD
Flash Modes: Auto/ Forced On, Off / Red-Eye Reduction On, Off
Flash Effective Range: 1.6 – 6.0 feet (0.5m – 1.8m)
White Balance: Auto
Picture Effects: Solarize, Black & White, Sepia, and Negative Art
ISO: Auto
Scene Modes: Soft Snap, Illumination Snap, Vivid Nature
Self-Timer: Yes, 10 seconds
Still Image Mode: JPEG (Normal)
MPEG Movie Mode: MPEG Video Mail (160 x 112) without Audio
USB Terminal: Yes, Powered USB bus
Dimensions (W x H x D): 3 3/8" x 1 3/16" x 1 5/8" (85 x 29 x 40mm)
Weight: 4.2 oz. (118g) w/ Batteries, Memory Stick® Media, and Neck Strap
Physically, the U20 is itsy bitsy teeny weenie. I’ve had so many people ask
about the camera when they see me snapping pictures with this thing. After I
show them that it is a digital camera, the comment from them almost every time
is "No way!". I’ll admit that I felt the same way when I opened the box and saw
it for the first time.
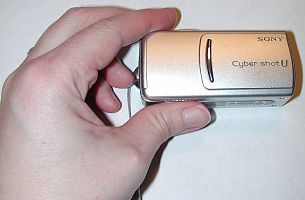
The camera’s case which is made of aluminum is available in silver, blue or
black, I went with the silver version. The camera is very solid and well made.
It passed my patented squeeze and creak test with flying colors.
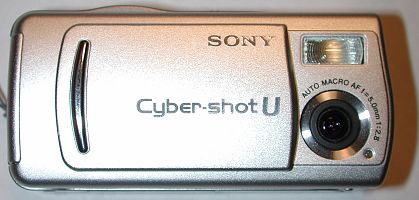
A lot of cameras on the market today seem to have button, dial and switch
overload. Thankfully, the U20 does not. The front of the camera has a slide open
lens cover which doubles as a power on / off switch. The cover has a raised grip
that makes it easy to open and close while holding the camera with one hand.
When the cover is opened, the lens, flash and timer LED are visible. The
location of the lens does not lend itself to accidentally photographing your
finger. At least I haven’t had any problems with that happening.
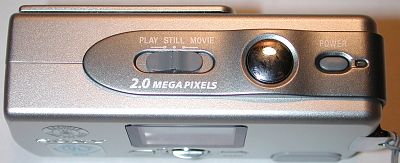
On the top of the camera is a 3 position slide switch that allows you to
choose between Play, Still and Movie modes. In Play mode, the camera turns into
a slide show of the images currently on the Memory Stick. Still mode is the
normal picture snapping mode, and Movie mode allows you to record 15 second
movies (without audio). A large shutter release button and power button are also
located on top of the camera. The shutter button when pressed halfway down,
causes the camera to auto focus on your subject. Pressing it the rest of the
way, takes a picture. The power button is a small recessed button with a small
LED beside it which glows green while the camera is powered on.
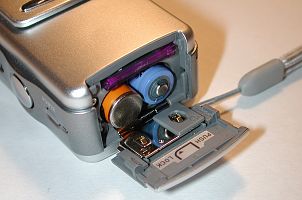
The left side of the camera has the battery and Memory Stick compartment, as
well as a hand strap attachment point. Inserting and removing the batteries and
memory media is easy. Included with the U20 are 2 AAA NiMH batteries and
charger. The charger is huge compared to the camera. I would rather see a
charger without a detachable cord that could be plugged directly into an outlet.
The charger is also dog slow! It takes f-o-r-e-v-e-r to charge the 2 batteries.
I’m talking 13hrs! No, I’m not kidding. I ditched the included charger after the
first time I used it, and am now using a much faster charger that I purchased
from Radio Shack. When fully charged, I found that I could snap pictures all day
(6-8hrs, 100 or so pictures) before getting a low battery warning. I never
bothered carrying a spare set of AAA’s with me due to their great performance.

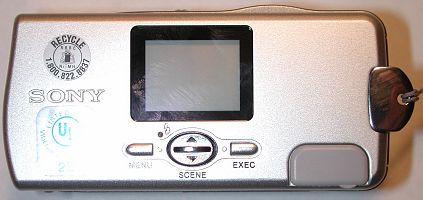
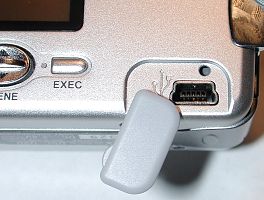
On the back of the U20 is the USB cable connector, Flash LED, menu buttons
and ultra small color LCD. A flexible plastic cover that is attached to the
camera protects the USB connector. If you don’t have a Memory Stick reader, you
can attach the included USB cable to your PC / Mac to transfer pictures.
The Flash LED is very small, and glows yellow when it is going to be used.
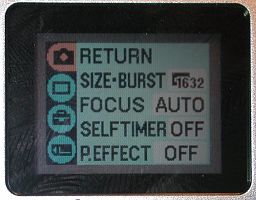
Next to it is the Menu button. Pressing this button causes a simple graphical
menu to be displayed on the LCD. Using the oval up/down control / scene button
next to it, you can navigate up and down thru the menu options. Then, pressing
the Exec button, the option is selected. By pressing the control / scene button
in the up direction, you can quickly toggle through four flash settings:
auto flash, red eye, always flash, and never flash. By pressing this button in
the down direction, you toggle thru the four scene settings: auto mode,
soft snap mode, illumination snap mode, and vivid nature mode. Soft snap is
basically for portraits, illumination mode is best for subjects with a dark
background, and the vivid nature mode is what you would expect. Personally, I
leave my U20 set to auto mode and don’t touch it.
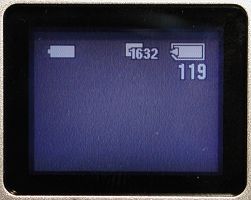
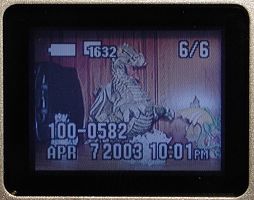
The LCD is the smallest digital camera viewfinder that I’ve ever seen or
used. It’s also the only viewfinder available to you on the U20. An actual
optical viewfinder would be a real help, and is one feature that I’d love to see
on the next version of this camera. Don’t get me wrong, the LCD works well
enough, but in very bright sunlight, it can be difficult to make out your
subject on the screen.
Taking pictures with this little guy is a snap (literally)! While on vacation
in Scotland, I got pretty good at whipping the camera out of my pocket, sliding
open the lens cover with my middle finger, pressing the shutter with my index
finger, and then sliding the lens cover back into the closes position. I almost
felt like the camera was an extension of my hand! From power up to the time it
is ready to snap the first image is very very quick. Totally beats out my Nikon
in that respect. There is also a setting that will allow it to function in burst
mode. In this mode, it will take 5 images in rapid succession.
Ease of use is important, but image quality is even more important. As a 2
mega pixel camera, the U20 isn’t going to win any awards in this area, but it
does an excellent job as a go anywhere, snap anything kind of digicam. You
really have to decide what your main purpose for a camera is before you buy it.
If you want to take pictures that you’re going to print and frame, you’ll
probably want a camera with at least 4 mega pixels. But, if you don’t print out
your images that often, and mainly view them on a computer screen, this camera
will work out fine in almost any environment.
You have a choice of two resolution settings: 640 x 480 or 1632 x 1224. With
the included 8mb Memory Stick, that gives you the option of saving 80 images at
640 x 480, or 15 images at 1632 x 1224. I set my U20 on the 1632 x 1224 setting
and used a 128mb stick for 246 images.
Below are a few shots that I took to give you a better idea of how well it
does. None of the images have been edited. Click on the thumbnails to see the
full sized image.


The camera comes with software to transfer the images to your desktop
computer. The software is pretty lame though… and from what I can tell, it has
no image editing features. Some special features that I really didn’t explore
(do people really use these?) are the selectable Sepia, Solarize, Black & White
and Negative Art Picture Effect modes.
I just love this little camera. It goes with me everywhere. It is built to
last, is easy to use and takes good pix. Judie thought it was so cool, that she
even bought one for herself after seeing mine in Scotland! The only thing I wish
it had that it doesn’t is an optical viewfinder. Other than that, it makes a
perfect picture snapping companion and a great first digicam for someone in the
market for one.
Price: $269.95
Pros:
Extremely portable
Simple to use
Cons:
No optical viewfinder
Slow battery charger
Included software is anemic
No audio feature for the movie mode
Product Information
| Price: | 269.95 |
| Manufacturer: | Sony |
| Pros: |
|
| Cons: |
|
Gadgeteer Comment Policy - Please read before commenting
my cybershot dsc u20 works well but does not display